
Abstract painting is one of my favorite types of paintings to do. I feel like there is always something new to try and explore.
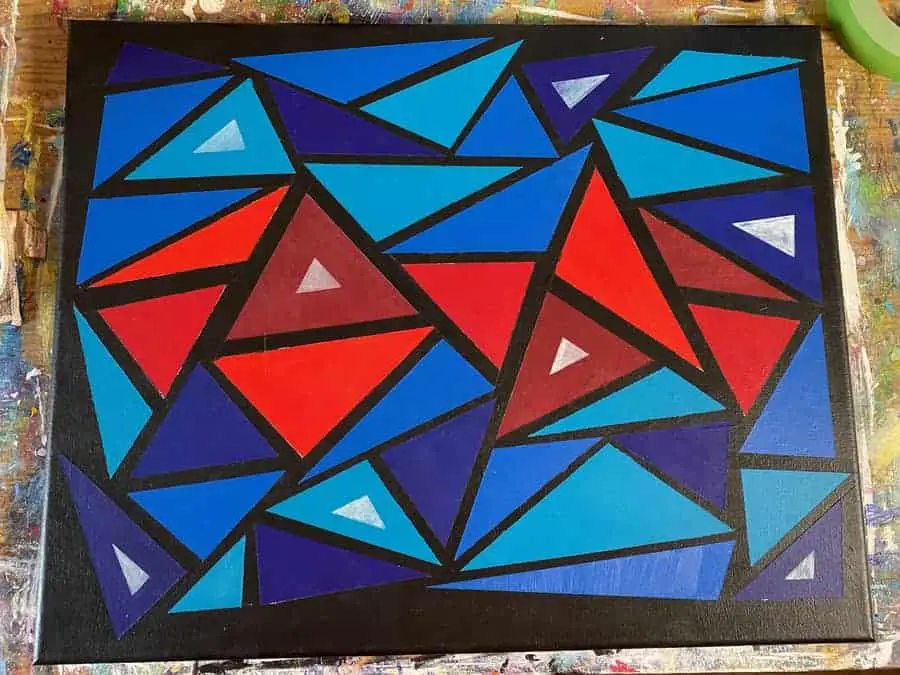
In today’s project, I want to focus on how to make a geometric painting. If you have seen some of my other abstract paintings I have some sort of attraction to triangles.
So in this project, the main goal is to create a geometric abstract painting with triangles.
Before we jump into the meat of things I like to start by gathering up a number of inspirations from the giants that came before me.
By doing this I get a sense of how other artists have approached putting geometric shapes into their works and how I might like to expand my use of them in mine.
Abstract Geometric Paintings to Study
First off, how do we even define an abstract geometric painting?
I don’t know if there is some official art world definition for it but I’m going to go with the plainly obvious definition of if it has geometric elements in it such as lines, squares, circles, triangles…etc and it doesn’t matter if they are perfect or not.
With this in mind, I generally start by creating a Pinterest board of different types of geometric style paintings that strike me in some type of way. Check it out here!
One contemporary artist I kept coming across in my results is Matt W. Moore. His distinctive geometrical style and eye-popping colors kept catching my eye.
Then I found the cool video featured above that he did in collaboration about 10 years ago at the time of writing this.
There are so many amazing abstract artists out there today it’s easy to get lost in the plethora of examples to learn from.
When I start to feel this way I just try to listen to my gut and choose some examples that speak to me to use as my inspiration. Then I get to work!
You won’t learn much until you start doing it. So don’t get stuck on this step for too long. Take your inspirations and start making something!
Choose Your Color Palette
One of my favorite things about abstract painting is the freedom to choose my own color palette. Sometimes I let it emerge organically while others I have an intent I’m going in with.
In this particular painting I had multiple intentions I knew I wanted to aim for.
I started creating this painting a few days before the 2020 presidential election so I wanted to represent the two major political factions of the United States. Obviously this would require red and blue.
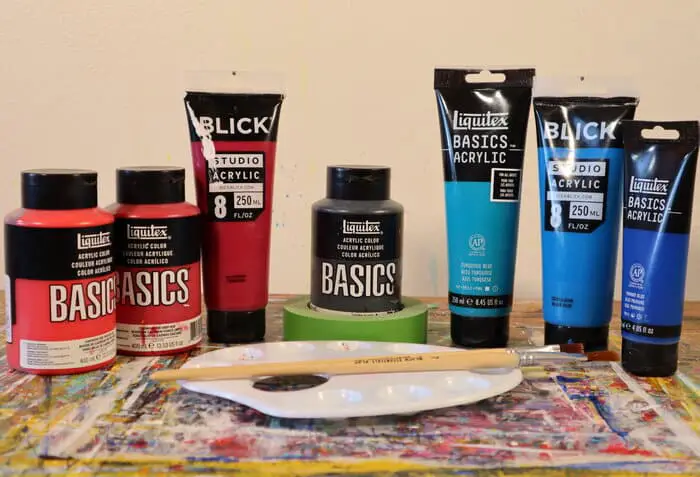
So for my palette, I decided to grab a few different shades of each that I have in my collection.
- Liquitex Basics – Cadmium Red Medium Hue
- Liquitex Basics – Cadmium Red Deep Hue
- Blick – Alizarin Crimson
- Liquitex Basics – Ivory Black
- Liquitex Basics – Turquoise Blue
- Blick – Cerulean Blue Hue
- Liquitex Basics – Primary Blue
While I welcome you to use the same or a similar palette if you’d like to try and come up with your own maybe think about something you might want to channel for inspiration.
For me, the election was on my mind and when I decided to do a geometric abstract painting I knew I wanted to focus on triangles. For no other reason than I have seemed to have some sort of growing infatuation with them.
They have seemed to just emerge in some of my paintings.
So then I start thinking about how making an entire painting of triangles might represent how broken I see the United States right now.
At this point, a picture begins to emerge in my mind that I must bring into existence.
I tell you this to give a bit of insight into my process so that it may help you with yours.
If you’re really having trouble drawing any inspiration from what your mind is currently gravitating to then a great backup plan to help get the ball rolling is to use the website Coolors.co.
Check it out here!
It’s basically a random palette generator. This is a super great tool to have in your pocket as a beginner abstract painter!
Start By Painting Your Background
For this particular abstract painting, I made a few mistakes here that I would like to point out so that you avoid them.
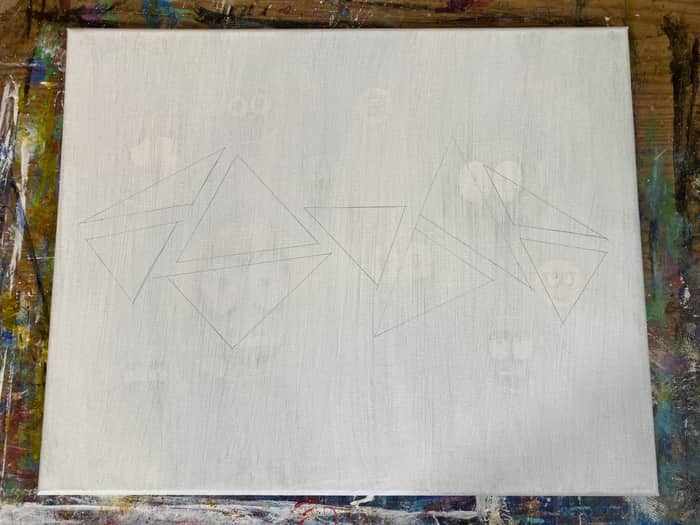
I started by drawing triangles onto my canvas using a ruler. This was my first mistake.
It’s difficult to see the lines on the canvas pictured above because I drew them lightly and because I reused a canvas that had a painting on it I just didn’t like.
That said, I do not recommend starting this way as I found it far more tedious and time-consuming than it should have been.
A better approach to starting an abstract painting like this is to paint the background first. In this example, I should have started by painting the entire background black.
You will see in the next few steps how this leads to problems later.
I have done a number of geometric style abstract paintings with squares and rectangles always painting the background first. For some reason in this project, I felt to get the triangles where I wanted them I needed to draw them out first.
Which is what lead me to make that decision to begin with.
After making the mistake of drawing the triangles I had to piece together the black background around them. As you can see here, this is definitely not the best way to do this.
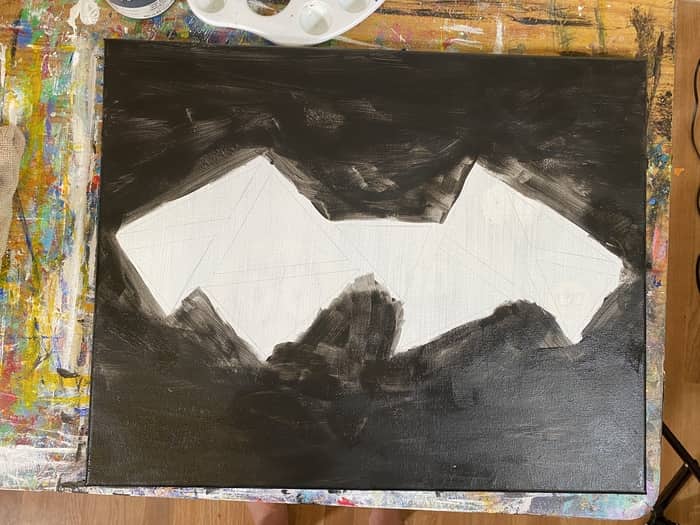
You’ll get a better idea of what I’m talking about as we discuss more of the steps you should take. You’ll see how this one mistake has a domino effect causing me to have to put in a lot of extra work along the way and if I do my job right I will help you to avoid the same mistake.
If you feel like you need to draw them out to get the placement right I highly advise painting the background first and then move on to drawing in the triangles where you want them.
You will avoid a huge headache!
Draw Out Your Triangles for Proper Placement
At this point, you should have your background painted. If you’re following my example and avoiding my major mistake then hopefully you are looking at an all black canvas now.
For the sake of guiding you in the right direction my example pictures and video are going to be jumping around on the different stages I went through.
I still feel like drawing out the triangles is the best way to go to ensure a good placement and organizational structure if you want to fill out the whole canvas like what I am doing here.
If you wanted to though you could potentially skip this step and go to the next step.
If instead, you’re choosing to do squares and rectangles these are a bit easier to just lay some tape down and paint.
Since I get to do another one of these types of paintings soon for a YouTube video I will have to experiment a bit more to see what else I can figure out that might help make it easier for you.
In the video above you can see where the painting is much further beyond the last step and where you are at right now but follow me through on this.
As you can see I’m using a white colored pencil and a ruler to pencil out the rest of the triangles.
If you’re going with other types of geometric shapes and elements that would be too complicated to just smack some tape down then take the time to draw it out.
It will ensure a better quality result.
Related Articles:
- Abstract Art Projects to Try
- How To Do an Acrylic Pour
- 10 Artists Who Wield a Pallete Knife With Master (Study the Best!)
- What Makes a Good Abstract Painting? The Principles of Art
- Abstract Artists on YouTube to Study and Learn From
Tape Off Your Shapes For Painting

So at this point in your project, you should have a black canvas with some white triangles drawn on it. It’s either that or whatever shapes you chose to go with.
Unless you skipped the last step, which is totally cool too! It’s whatever works best for you to achieve the desired result! Sometimes to develop as an artist you have to take a few risks that your gut is telling you to take.
They don’t always work out but they do ALWAYS lead to learning.
When it comes to what type of tape to use for this step, masking tape is a good option if you have any handy already but later on in the painting I end up switching over to Frog Tape. This is basically a type of painter’s tape that gets a nice tight seal.
It was suggested to me by a friend on Instagram and got me thinking I should probably test a few different types of painter’s tape to see if there is one that we could rank as the best.
I know I had a hard time getting sharp lines consistently with masking tape and was lamenting about that publicly on IG.
The Frog tape definitely gets sharper lines but I did still have a bit of leakage here and there. So not perfect yet but still A LOT better than just regular masking tape.
I’m beginning to suspect some paints are just more fluid than others. In this painting whenever I did the primary blue triangles there was something about the consistency of the paint that helped make the lines of those particular triangles better than the others.
I think perhaps I have blabbered on enough about lines and tape for now.
If you have your whole canvas filled up with triangles like what I have in my example, there are only going to be so many triangles you can tape off at once.
This can take a while too because some colors dry more transparent than others. Like the primary blue for example. I had to do about 5 layers of blue on each triangle to ensure the blue had the level of saturation I wanted.
Start Painting In Your Shapes
Hopefully at this point you have a decent fraction of the shapes on your canvas taped off.
This is the step that may take the longest depending on the amount of shapes you have on your canvas and the colors you have chosen to use.
If you’ve been using acrylic paints for any amount of time then you probably already know what it was I was talking about in the last section.
Certain colors dry a bit more transparently than others. The turquoise color used in this painting is very opaque and only takes a layer or two.
While colors like primary blue dry so transparently that it takes 4 or 5 layers to get an opaque color that doesn’t show the layer underneath.
As a result, this step can take a while if you want a saturated and opaque color like what I went for here.
If you’re looking to accelerate things I like to use a hair dryer from time to time.
For me this is especially useful since I’m constantly trying to document what I am doing for you and sometimes when I’m making a YouTube video, check out my channel here, I need that extra boost to expedite things along.
To avoid leaks under the tape be sure to put the tape down tight and run your finger over the edge to ensure it is sealed.
The Frog tape will certainly do a better job at keeping a seal but be weary of paint that is very fluid.
I seem to be finding that the thinner the viscosity of the paint, the more likely it is to leak under the tape. One way to avoid this is to apply light dry brush layers.
This obviously will take longer but if you want to avoid the headache of leaks under the tape it may be worth the effort.
Rinse and Repeat Until Complete
At this point, we’ve covered pretty much everything you need to know to complete this simple abstract painting project. The above video is a YouTube Short I made to show a bit of how the painting progressed.
If you’re not familiar with YouTube Shorts, at the time of writing this they are a rather new feature on YouTube. It is YouTube’s response to the TikTok competition.
At the moment, they are all the rage in the creator world as they get an enormous amount of organic reach. If you’re not sure what that is I wrote a bit more about it over in my article on “How To Get Started Selling Art Online For Beginners”
Basically though it means your content will get distributed to a lot of people for free. This is good for any artist out there trying to make a full time living as an artist but doesn’t want to pay advertiser dollars to do it.
That said, this short video should give you a decent idea of how my painting played out and why I’m recommending the sequence of steps in the order that I am.
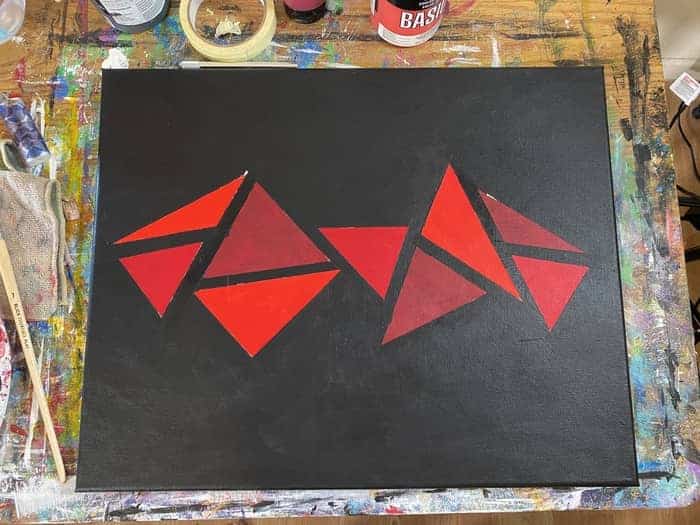
You can see where my first red triangles in the center were surrounded by these empty white spaces thus causing me to have to tediously tape off all the triangles to fill in the spaces between them.
If you’ve been following my steps as listed in the headlines, and not letting my weird sequence of illustrative images mess you up, then you should be on a much more efficient path towards completing this painting more easily than I did.
As always, once you complete your painting, sign it, seal it, and hang it!
If you make something inspired by this post and want to share your work with me I would love to see it!
You can send it to me on Instagram here!
If you’re looking for other abstract painting techniques to try check out this blog post here! Or this YouTube playlist here!
