

I am embarrassed to admit that this painting project has been one that I have wanted to do for over a year now. Once you know how to paint a galaxy it should be easy to paint a night sky background for any type of landscape painting.
Today we are going to focus on learning how to paint mountains under a night sky!
If you haven’t yet learned about how to paint a galaxy I have a blog post I wrote that you can check out here or check out this YouTube video!
Don’t worry though! I’m going to break down my entire process below. While you don’t have to check those resources out first to be able to complete this painting it certainly can help!
That said painting a basic night sky is super easy. It’s more the painting of the mountains that I am worried about myself!
Never fear mistakes though. Mistakes make you into a better artist. So if you’re like me and have never painted a mountain before let’s learn how together!
Let’s get started!
Side Note: If you would prefer to watch the YouTube video for this painting click here! Then subscribe to my channel while you’re there! Or keep reading and check out the video at the end of this article!
Collect References and Examples On Pinterest
While I am fortunate to live in Colorado where we have a beautiful view of the Rocky Mountains on a daily basis.
That said, I’m not the best photographer and in the interest of saving time I often opt for the technique I use for most of my projects. That is to go to Pinterest and make a board of various pictures of the subject I’m seeking to make.
Obviously today we want to specifically collect pictures of mountains at night. As part of this process, I also look to collect a handful of examples of other artwork just to see how other artists have approached it.
This both helps to inspire but also is a great way to ensure you’re developing yourself in a way that produces original works.
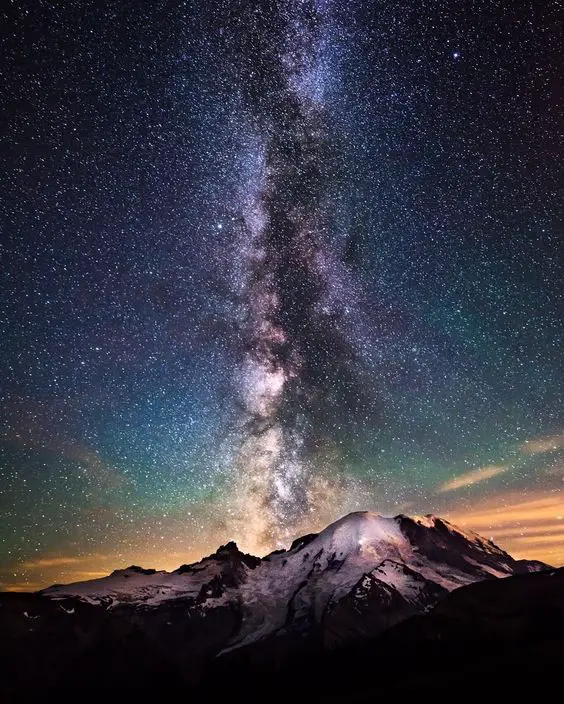
Unfortunately today there weren’t a whole lot of mountain paintings under a night sky for me to collect so we just went with this photo of the Milky Way in Mount Rainier National Park by Kevin Shearer.
Check out the rest of the Pinterest Mountain board!
Before we get started we need to gather up our paints and supplies. I always do my best to show you my process so that you are capable of choosing any reference picture you want. So let’s discuss that a bit next.
Decide What Colors and Paint Brushes You Need
When it comes to choosing the colors for your painting it can be a challenge to know what you might need. Especially if it’s still early on in your art journey and you are not yet used to how certain colors mix with each other.
To be honest, the best thing to do is just select a palette of colors that you think you will need to complete the painting then see how it goes.
Sometimes you will grab colors you don’t need and in the middle of the painting may need to pull out a color you weren’t expecting you would need. This is all part of the learning process my friend.
You may even find yourself trying to get a specific color but unable to reach it with the current paints you have. This is usually due to color bias which I discovered when I tried to make purple and failed!
Check out what color bias is and how to make purple here!
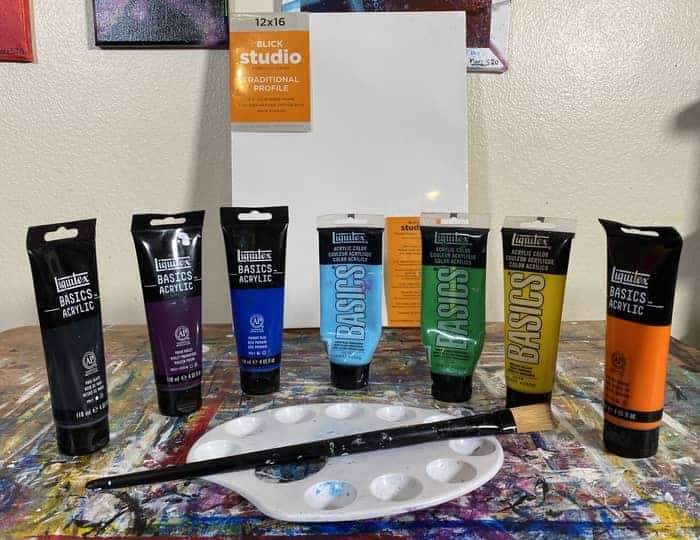
So my thought process when looking at this picture is that I’m going to need black, blue, green, purple, orange, yellow, and white.
To be more specific the colors you see in the picture above are:
- Mars Black
- Prism Violet
- Primary Blue
- Light Blue Permanent
- Light Green Permanent
- Primary Yellow
- Vivid Red Orange
- Titanium White
If you’re going to be using the same reference that I am in this project then try to gather up the same colors or whatever you have in your stock that is closest.
If you are using a reference picture of your own choosing then just do your best to gather up what you have that you think you will need to get the job done.
I recently discovered it is very helpful to have your paints available on a shelf not too far from where you paint. Before I used to keep all my paints in a bin where they ultimately would get buried.
This caused me to go digging every time I wanted a particular color. Having my paints spread out on a shelf in a way that is similar to the color wheel has definitely increased my efficiency when I realize there is some other color I need to grab.
If you have the space and ability to setup a shelf for your paints then I would highly recommend doing this!
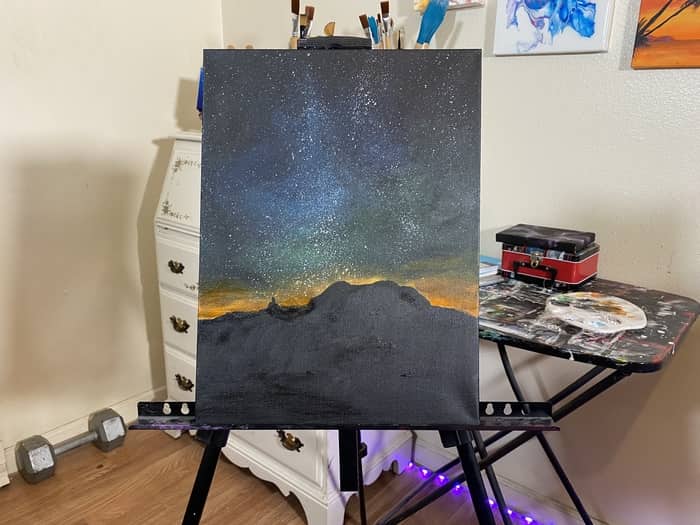
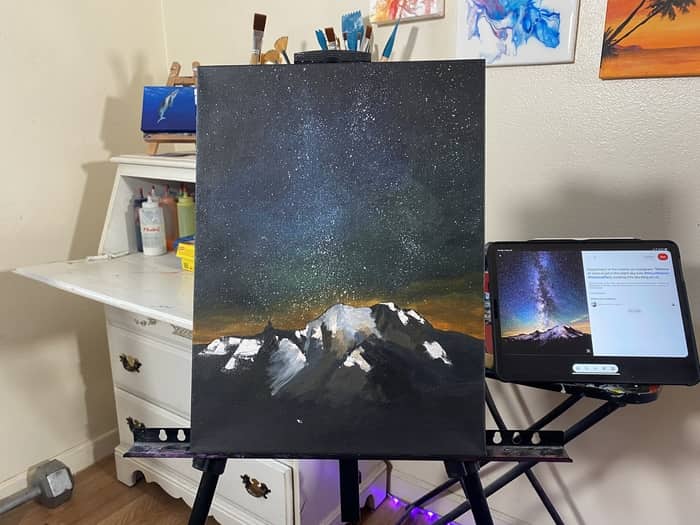
Draw Mountain Line and Start Painting In The Sky
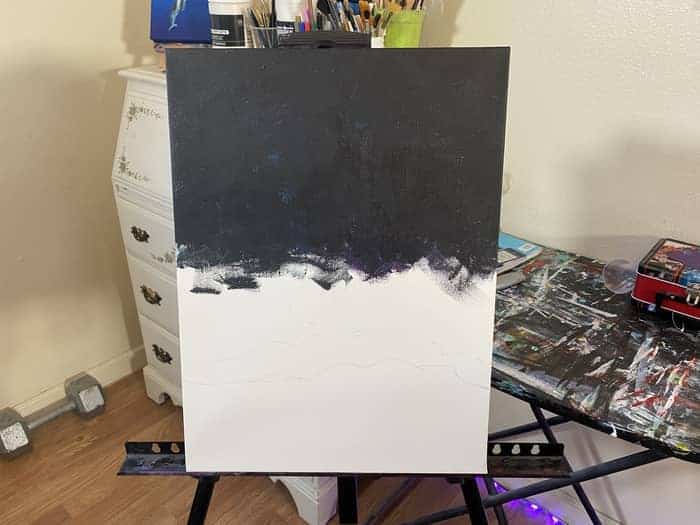
To start with, draw a light line roughly where you want your mountains to go. This will help you to get a good placement of your horizon.
It’s a little bit difficult to see in this picture but I actually drew one and then decided I thought maybe it would look better if it were a bit lower. So I drew a second line as well.
Ultimately, I decided to stick with my original line and will be painting over the second one I drew but between the two it helped me to know where my sky ultimately is going to stop.
Obviously with the sky being our background we want to get that going first. Especially since to get the starry effect we’re going to be using the flick technique to flick some white dots onto the canvas.
Since this technique tends to cause little white dots to go everywhere we want to make sure to do that before we start painting the mountains and the reset of the landscape.
This way if and dots land in that area of the canvas they will be covered by other layers.
One of the reasons I chose this particular reference picture is the simplicity of the foreground that’s underneath the mountain range. It’s always a good practice to keep new things as simple as possible to help keep one motivated towards completing the entire project.
I think the hardest part of this painting is going to be getting some good details on the mountains so it’s nice that the foreground is basically just black.
In this first layer for the sky I’m using Mars Black and Primary Blue. Starting at the top of the 12″ x 16″ canvas and working my way day I begin to work the primary blue into the areas where I know we are going to be looking to get a bit of that bluish glow to the sky.
I found that doing using a wet on wet mixing technique on the canvas is a good way to get that blue glow starting to emerge. A wet on wet mixing technique is where you put one color onto the canvas by itself and then mix the other color you want in with the color on the canvas already.
You’re basically mixing your colors on your canvas as opposed to your palette. I find one of the benefits of taking this approach is that you can get a nice gradient or blend from one color into the other. In this case it helps soften the transition from a bluish hazy glow into a dark space background.
We will be using this same technique in the next steps too to get the green glow and some of the sunsetting lit clouds.
Add Blue and Green Haze, then Add Stars
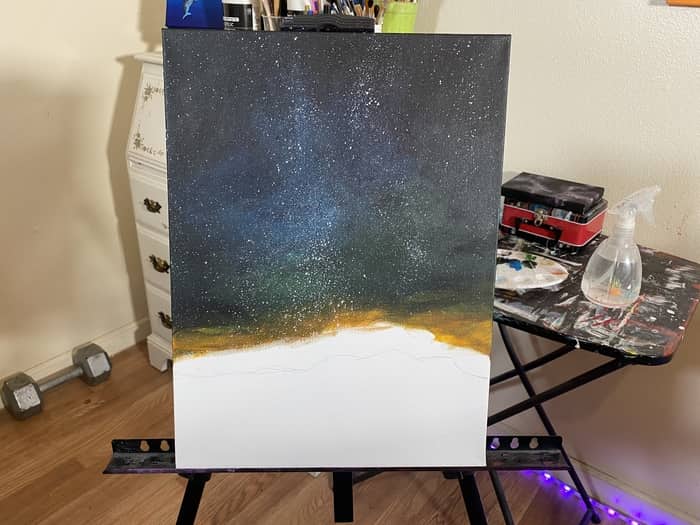
In this step, we want to start by continuing to work down our canvas painting the night sky in.
Notice that in the reference picture we have a haze of multiple colors going on as we move in towards the center of the canvas as well as down it towards the mountain range.
Towards the upper center of the canvas, as I worked my way downwards, I continued using the wet on wet blending technique to add in blue gradually until I started creating a light haze.
Occasionally I would mix a tiny bit of light blue permanent into my mix just to add that slight step up in value to try and get some of the light blue glow to come through.
It will help to occasionally wash your brush off and leave a decent amount of water in it after to assist with your blending. This will also assist with the thinning of the pigments in your colors helping to ensure they dry more transparently helping you to get that hazy glow effect.
Moving on down the canvas I kept starting on the outside with mars black and then would work my way inwards adding in the color I needed to get the right haze.
There were moments where I added my green too heavily saturated. This is easily fixed by using the wet on wet technique and quickly adding some more black in while you spread it out on the canvas until you mix it to the color you need.
Next is the transition towards orange yellow horizon where the sun appears to have just recently set leaving a light orange haze on the clouds above the mountains.
You basically want to do your best to continue using the wet on wet technique to get a good transition between the dark night sky and the glowing horizon.
For this section I used the vivid red orange mixed with a tiny bit of primary yellow. Remember you’re going to be covering up some of this with your mountains so be sure to bring it down far enough where you mountain line will come into the gradient.
As you work your orange yellow mix onto the canvas you will want to gradually blend it into some of the wet mars black you already have on the canvas. Don’t forget that a bit of a wet brush can be helpful as well!
Eventually you will get a feel for the things I’m talking about here. Especially as you try them and begin to see what works.
Paint Your Mountains In Using Mars Black
This step is pretty straight forward and easy. Especially if you took my advice in the last section and were sure to bring your orange haze down low enough
You basically want to create a silhouette of your mountain range. You want to load up your flat brush with black paint and go nice and slow for the top edges of the mountain.
This is how you can get clean, sharp lines that make the mountain look rocky.
Once you get the top of the mountain range how you want it paint the rest of the canvas in black and you’ll be good to go! You may want to switch back to a larger flat brush if you were using a smaller one to get your mountain edges.
This will be more efficient and help save time. I was using a smaller flat brush to paint my mountains and then as I was getting close to finishing filling in the mountain area I realized I should have used the larger brush right after getting the mountain line painted in.
The next step is the main part of this painting I have never tried before. We will now attempt to add snow and other details to the mountain!
Try To Add Mountain Details Using Palette Knife
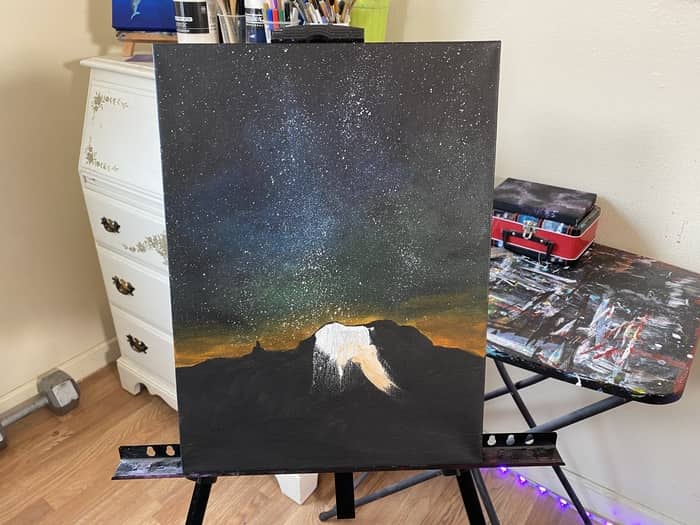
When it comes to mountain painting, you oftentimes see artists use a palette knife to create these great looking rocky details to a mountain in one smooth sweep.
After having tried it myself, they certainly make it look much easier than it is! As you can see from the picture above.
My first attempt at this technique came out like a blob of white.
If this is your first attempt at trying to paint mountains like it is for me, I highly recommend trying this technique so that you can get a feel for it.
For me, it’s just one of those things I have to put in my mental arsenal of tools and techniques. It is an enemy to be defeated. Art is war!
After this first attempt I decided to try and see what other artists out there have to say about doing this technique.
In the video, I mention having a memory of watching Bob Ross as a kid do this technique. He always made painting look so easy.
I’m now old enough and wise enough to know that when you see someone do something and it looks easy that’s simply because they have invested the time to be good at that thing.
That said, who better to show us how to do this correctly than a classic Bob Ross clip! When you play the video below Bob is showing us how to correctly load the paint in a roll on the edge of the palette knife.
Check it out!
That’s definitely helpful information towards getting some better results!
It looks like the trick is to just barely touch it down to the canvas.
Ross also mentions that using paint that is too thin can be a problem too. He says the paint should be rather firm to get the proper breaking effect.
That makes a lot of sense to me now that I have tried it in two different ways.
Before I made my second attempt it wasn’t the Bob Ross video I had watched to get a better idea of how to do it so I didn’t have this information yet.
I’m all about plugging my fellow creators on this site so, with that in mind, this video by the Wild Creates channel covers a number of common mistakes people make when painting mountains.
This was the one video I actually watched before I painted over my first attempt to make a second attempt.
While my second did go a bit better as I tried to keep the paint on the tip of the palette knife and press it in lightly I still didn’t quite get the results like those sorts we saw demonstrated in the videos above.
We can’t ever get there if we don’t try right?
Here is a look at my second attempt. You can also check out the video here too!
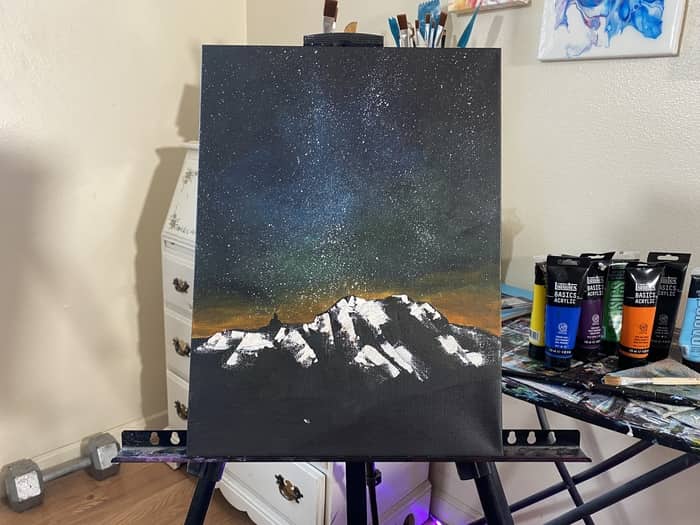
If you have made a couple of attempts and are still having trouble like me I say it’s a good idea to finish it out with a paintbrush. I am definitely better with a paintbrush.
This is a great example of something I talk about a lot and that is being conscientious of where you encounter issues. In this case I have identified I need to practice this palette knife technique in order to get better at it.
With that in mind I will definitely be adding more mountain paintings to the agenda. We can’t hide or shy away from our weaknesses.
We need to tackle them head on!
Use Your Paintbrush to Add In Details as Needed
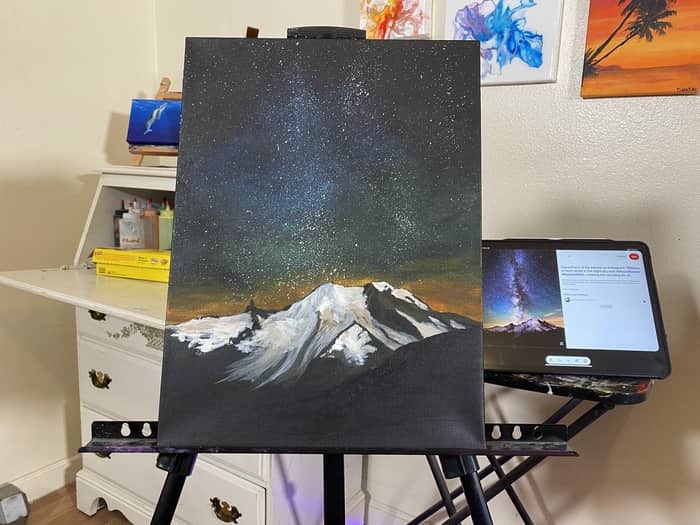
At this point I hope that this article has at least helped you to avoid some of the mistakes I made in my attempt with the palette knife.
If you made your attempts and are feeling discouraged at all don’t sweat it! Molding the mountains with our brushes is a lot easier to do.
At least, in my humble opinion. Don’t get me wrong though, this was still challenging for me to accomplish.
I tried to use some of the details I applied to the canvas with the palette knife at first but ended up painting over most of it anyways.
I basically approached this part of the painting as a gradual molding process.
I generally try to look for shapes of various colors to fill in and break it down from the largest shapes I see.
Getting the colors right and the values where I needed them to be took a bit of trial and error.
Especially when it came to giving the mountain shape and form.
Be persistent in your attempts and observe your reference carefully. If you watch the video you can see me constantly looking back and forth between my reference and the painting.
Constantly looking for the variations in color and working to create the form of the mountain.
Once I finally got the mountain to where I wanted it to be I then painted in the black silhouette of some sort of hill in the foreground in front of it.
At this point we have one more step to go to finish it out.
Add More Colors and Stars to the Sky
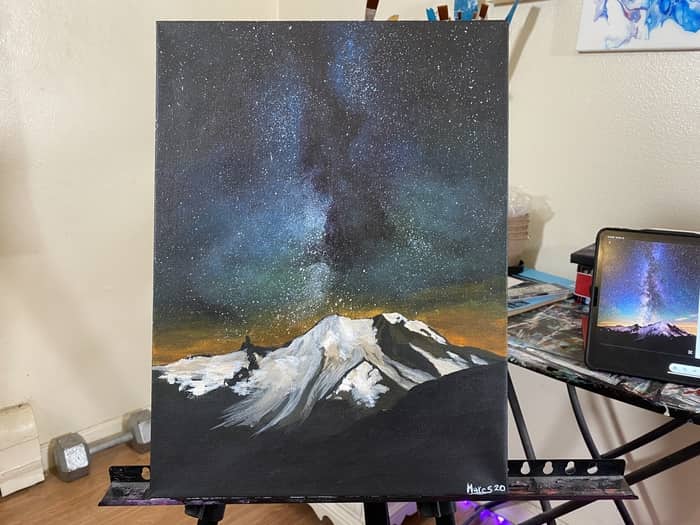
Our last step is to finish making that starry night sky look beautiful!
We need to add more colors and more stars to really get that glow and make it look like the milkyway.
To start with, I needed to brighten up areas of the sky where there are clusters of stars causing a brighter glow in the blues and greens.
I basically used the same techniques as earlier on in the painting adding in my colors gradually and slightly watered down so that they would dry more transparently.
Next, we need to add more stars using watered down titanium white that is about the consistency of milk.
The best way to protect your mountain is to tape a piece of paper or paper towel over it to protect it from the paint splatters.
Then we once again want to focus on creating that divide down the center where there is a dark gap in the cluster of stars.
This is where that control you get with a flat brush that has stiff bristles comes in handy. I’m not as confident about being able to control the splatters like I was able to do with these DickBlick flat brushes I have.
This was the first painting I made where I used them in this way and it turns out they are really great for this technique.
Finally, if you want to check out the video I made for this painting so you can get a better sense of the things discussed in this article click play!