
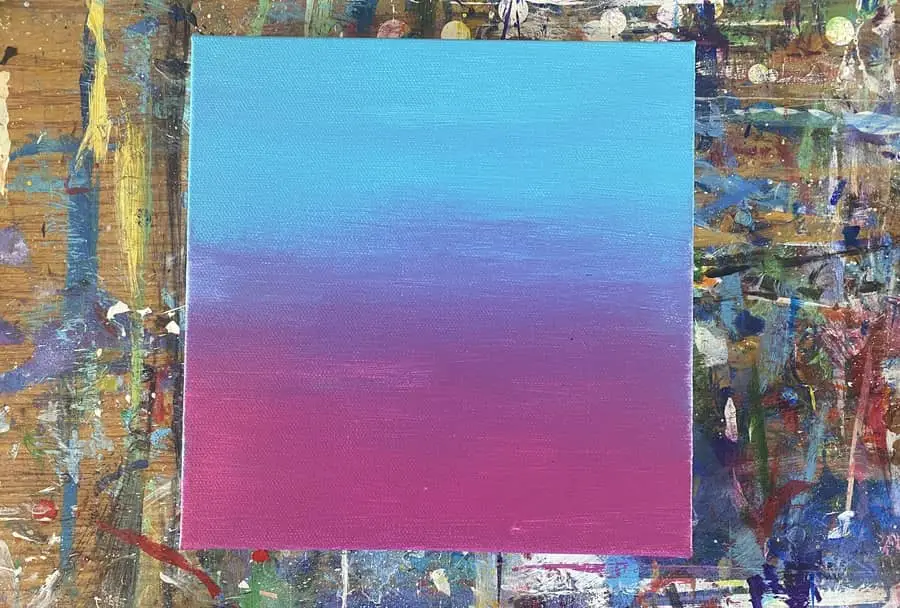
Blending acrylic paints smoothly can be a real challenge when you’re just getting started. Heck, I’ve been painting a couple of years now and still have some difficulties with it myself as you can see from this example photo above.
So I decided to do some research and then tried a number of blending techniques to figure out the best way for beginners to achieve a nice smooth gradient.
The easiest way to blend acrylic paint into a smooth gradient is to make sure you are using paint with the right level of consistency and the right type of brush. You want your paint to be the consistency of slightly thick gravy and it helps to use something like a filbert brush. The rounded tip is better for getting smooth blends.
There are quite a variety of ways to go about getting a good blend with your acrylic paint.
There are also a few key things to be aware of in order to ensure you are getting the results you want. Things like color bias and paint consistency can have a big impact on your ability to get a smooth blend in your gradient.
Keeping your paint wet and workable seems to be a primary factor needed as well.
While I have my own experiences and challenges with this issue there is so much great content out there by other artists that I’d be doing you a disservice if I don’t cover what they are advising.
Let’s start with my own mishaps in my art journey so far.
Be Aware of the Color Bias of Your Paints
If the issue you are facing when you are trying to mix your gradients is that your results are looking muddy then it is likely color bias is your issue.
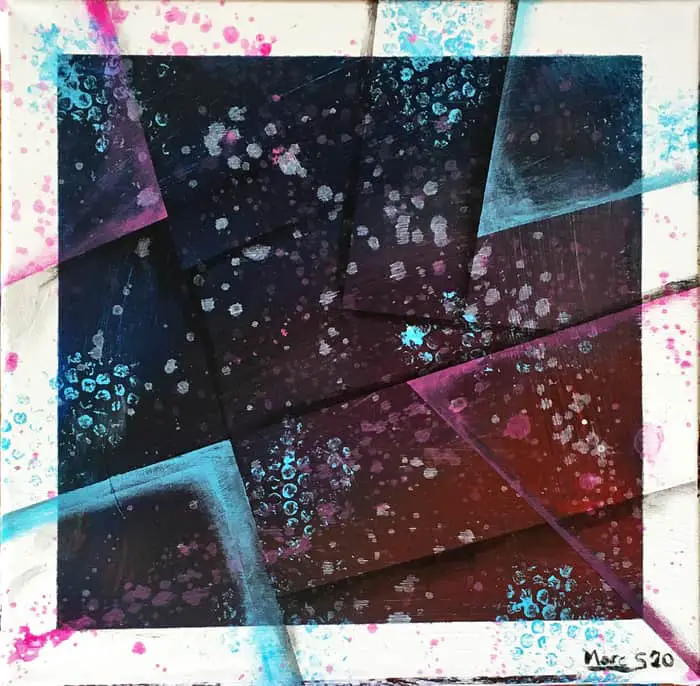
I remember when I did the abstract painting above. If you’re interested in the step by step of it check it out here! The very first step was to create a gradient between the blue and the red colors I had.
At the time, I was unaware of color bias and the fact that red and blue do not always make purple! I should have been clued off to this fact with this painting.
When I went to blend them in the hopes to get purple for that perfect gradient I was very frustrated at the muddy results. It didn’t click at this point what the issue was.
Quite a bit later I went to mix a bottle of purple paint for acrylic pouring only to find out the hard way that blue and red don’t always make purple. To learn more about color bias and how to mix purple check out the article I wrote here!
The key thing to point out here is to be aware that some of your paints will have a color bias that may impact your ability to get the clean blends you are expecting to get.
A color bias is when your paint has pigments of another color in it. In the painting above I used Cadmium Red which has a yellow color bias. To understand this think about what will happen when you mix red, blue and yellow together.
You end up getting a muddy brown.
If you suspect this is the cause to your problems I show in the article linked above how you can test your paints for what their color bias might be. Then you will know what will mix with what to get the colors you want.
I likely will do a whole research page on this at some point to provide you with a quick reference table so you know what will work.
The Consistency of Your Paint
Okay, now we are going to dive into some of the amazing advice and content that already exists out there from other artists who are way more awesome than anything I can do yet!
Syndia Art has some great pointers in this video. One thing she advises that I didn’t realize may be causing some of my own issues is the recommended consistency of the paint.
In fact, she is the one who recommends the consistency be like a nice thick gravy as previously stated above. I thought this was such a compelling way to describe what she is showing in the section of her video I clipped to above that I couldn’t think of a better analogy.
To achieve this level of consistency, if your paint is too thick, you can use a medium or a flow aide.
Credit where credit is due though, Syndia has some really good tips in her video that will help you get that smooth gradient you might be looking for.
She shows how when your paint is too thin it creates messy see through streaks and when it’s too thick you can end up with visible brush strokes.
She also recommends the use of a softer brush instead of one with stiff bristles. Not just a soft brush but the filbert brush is ideal.
That said, I do not have a filbert brush and get good blends with just a square brush. You can even see her using a very large square brush in one of her examples so the filbert isn’t totally necessary.
It’s more about consistency of paint, the stiffness of the bristles, and the pressure you put on the brush.
She advises against spraying your canvas with water or mixing your paint with water but I have seen plenty of artists use this method successfully. Especially when working on an abstract piece.
Let’s take a look at what some other artists are advising.
The Big Brush Half and Half Technique
In this video Rinske Douna shows 3 different techniques she uses to get a smooth blend between her colors.
The first two techniques are quite common and likely what you would do without even researching like you are doing right now. I still would recommend checking them out as they will be useful to you if you are not that good at blending yet.
The third technique though I thought was a bit unique so I wanted to feature it.
What she does is takes a rather large square brush and loads up half of the brush with one color she wants and the other half with the other color.
Then she starts painting in the middle of the canvas where her two colors will meet and blend together. Next she gradually works up and down creating a nice smooth blend in the middle of the painting where you need it the most.
Finally she comes back and adds more of her two colors to the tops and bottom of her canvas where they are needed.
I’m not too sure what kind of acrylic paint she is using but if you look at its consistency of her paint it does seem to stay wet for some time allowing here to continue to be able to mix her blends between the colors she adds later.
Notice that she is also using a very large filbert brush, just like Syndia recommended.
The whole video is certainly worth a watch and she even created a second video on it later on. Looking at the smooth and beautiful blends she gets for her abstract works she is definitely one to study.
Related Article
- Blue and Red don’t ALWAYS Make Purple! (How To Mix Purple)
- Abstract Acrylic Painting Techniques: Tools & Techniques For Beginners
- What Can You Use Acrylic Paint On? 13 Surfaces To Paint On!
- Acrylic Painting For Beginners – Your Guide to Getting Started
- How To Do an Acrylic Pour
Keeping Your Paint Wet and Using A Mop Brush
Lisa from Lachri Fine Arts has a unique approach to take that you should know about.
First off, she recommends the use of a mop brush. This is something I have seen recommended in a few other places online and it is a really great tool for getting a nice soft blend between colors.
It is a very soft brush and something that when needs to be used very lightly to avoid picking up too much paint.
The unique thing that Lisa does that I haven’t seen any other artist doing is she uses an air brush to spray a light mist on her canvas every now and then to ensure the paint stays wet and workable.
She, like me, uses primarily Liquitex paints. I often have trouble with my blends because Liquitex paints dry rather rapidly.
This is obviously problematic when you try to mix your more recently applied wetter color into your somewhat wet paint that you just put on the canvas a few minutes ago.
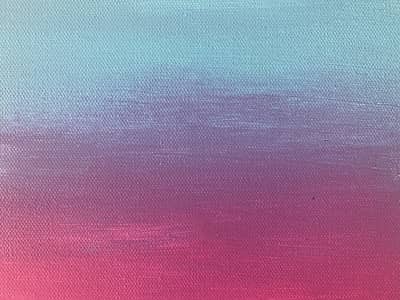
This not only results in a sub-optimal mix but you end up with lines and streaks as you see in this picture here.
You can also see a slight see through spot right below the blend on the left where my canvas is starting to show through. This is the result of wetting my brush too much in an effort to try and spread the paint around further.
All of the artists recommend using a damp brush but be sure it’s not dripping wet. After you clean your paint off of it wipe it off on a towel or rag so it is damp but not wet.
This will also help you make sure there are no more pigments left over from the last paint you were using, which again, can mess up your mix.
If you try to wet your paint with a spray bottle the big and heavy droplets of water are likely to leave spots and make your blend even worse.
I personally don’t have an airbrush in my collection yet and am not likely to get one just for this use but I’m sure if you were interested you can find a rather cheap one to go with. Especially if this is all you plan to use it for.
How To Blend Acrylic Paints Like Oils
When people refer to how to blend acrylic paints like oils what exactly do they mean by this?
Oil paints take a lot longer to dry than acrylics. So when people want to know how to blend acrylic paints like oils what they are really asking is how can I keep my acrylic paint wet for a longer period of time so that way I can get a smoother blend.
We have already covered a few different ways to do this but in this particular demonstration above Greg uses the Luquitex Flow aid to help thin his paints out and ensure they stay wet longer.
The above video should play at the moment where he is showing this particular product.
I’m not sure why he chooses what he calls the blender brush to apply the paint. Which as far as I can tell is the same thing as the mop brush previously mentioned.
I guess the blender brushes are sold for makeup application though.
It doesn’t seem like the best brush to use to apply paint to the canvas and judging from previous examples of how other artists use it to get good blends this is probably not the best way to use this brush in getting good blends.
It works for this artist though and I think that should be a key takeaway from this page. There are so many ways you can approach getting a smooth gradient blend that it is entirely up to you and what you are comfortable with in order to get the results you want.
Use Interactive Acrylics that Reactivate
This last video featured here is packing a TON of useful techniques to be aware of when it comes to blending your acrylic paints. This is perhaps the most informative video on this whole list.
It is a lot to take in all at once but well worth the watch to see the many different techniques that Chris demonstrates in this video.
The one I’m most interested in telling you about is the use of interactive acrylics that reactivate.
I had no idea this was even a thing. So if you’re anything like me this is a noteworthy discovery.
It appears that the brand Chris mentions in the clip above, Ateleir, is the only brand that makes this type of paint right now.
As we have already identified in nearly all of the previous sections, the biggest hindrance to getting smooth blends is the paint drying too fast.
Atelier interactive paints are special in two ways. First, they retain their moisture and wetness for much longer than regular paints.
Second, they can be reactivated with a mist of water.
Chris even mentions that if you happen to let your painting dry over night and want to make it workable again you can use Atelier’s unlocking formula!
This is a special formula that Atelier designs to be compatible with their interactive paints just for this exact purpose.
That’s a pretty special feature and set of products for us acrylic artists out here trying to find a way to keep our paints workable for longer.
This seems like a rather new product being offered. Atelier is the only company that makes interactive acrylic paints like this.
I reached out to Atelier to get a bit more info on this product and when it was first released. Thankfully they were very quick to respond!
It turns out Atelier Interactive was first released in Australia in 2005 and then in America in 2006. The company that invented it, Chroma, was founded in 1965 by artist and educator Jim Cobb.
It is a patented formula so that explains why they are the only company offering this type of acrylic paint so far.
It certainly would be a useful set of paints to have in your collection if you do a lot of wet on wet work where you need that sort of flexibility. Especially when it comes to getting smooth gradients and blends!
I’m sure if you try some of the techniques or products featured on this page you will find the one that works best for you and in no time you will be making your blends as smooth as a baby’s bottom!
